Moving Synapse Databases Between Subscriptions – Practical Guidance

One of the tasks, we often do with migration projects is move large volumes of data. Depending on how you are configured, you may need to do the migration project in a development or UAT environment as opposed to a production environment. This is particularly true if you have policies in place on your production subscription that don’t allow the individuals doing the migration and validation tasks to work in that subscription.

Just Copy It… Nope

So you can copy Azure SQL Database using the Azure Portal, PowerShell, Azure CLI, and T-SQL. However, this functionality is limited to Azure SQL Database and does not work for Azure Synapse databases (a.k.a. SQL Pools). Early in 2021, the ability to use the copy functionality to copy databases between subscriptions is also supported but requires security work to make sure the permissions in the database servers and networking allow that to happen.

You can find out more about copying Azure SQL Database in this Microsoft Doc.

Just Restore It… Nope

You can restore to the current server or another server on the same subscription. However, you are unable to restore across subscription boundaries at this time. If you need to move to another server in the current subscription, the process is straightforward, you can use the restore process in Synapse to restore to the current server using a different name. You can also restore to a different server in either the current or different resource group in the same subscription. The restore technique is used in our move process, so details on how to restore a Synapse database will be in the next section.

Let’s Move a Synapse Database

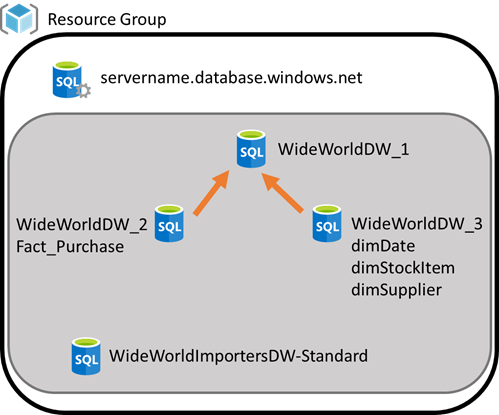
The process to move a Synapse database to another subscription requires some planning and pre-work. The first thing you need to do is create a new SQL Server in the same subscription you have your current Synapse environment. Because you can’t simply create servers, I would recommend that you add an Azure SQL Database to the server as a placeholder. An S0 should be sufficient to keep this server in place for what we are doing. DO NOT ADD anything to this server that will not be migrated. This is a temporary holding place for migrating databases. (This also works for other SQL Databases, but other options may work as well but are not the focus of this post.)

Now that you have the migration server created, the next step is to create a restore point. While this is not required because you can use the automatic restore points, creating a user-defined restore point is recommended. A user-defined restore point, allows you to choose the status of the database you want to migrate, rather than relying on the automatic points and trying to make sure you pick the right time (in UTC of course).

Once you have set the restore point, in the database you want to migrate, select Restore to open the panel to restore your database.

On the restore page, you have a number of options to complete.

  • Restore point type: Choose User-defined restore points
  • SQL pool name: This is not a big deal. The name is the database name used during the migration process and is not the final name used in the target server. Make sure it is something you know.
  • Restore point: Select the restore point you created for this purpose.
  • Server: Choose the migration server you created as the target.
  • Performance level: This one is more interesting. I typically choose a smaller performance level for this restore. Keep in mind that Azure needs to allocate resources to support the restore. Because this is not a final deployment, smaller may go faster. However, NO SLAs exist for this process. That means your mileage will vary. We have seen restores happen in 30 minutes one day and over 5 hours the next. It will be very dependent on the data center and how busy it is. This time variation must be accounted for in your planning.

The next step is to move the server using the Move operation on the server page. You have the option to move to another resource group or another subscription. In our case, we will choose another subscription. IMPORTANT: You will need Contributor permissions in the target subscription in order to move the server to that subscription.

After you have moved the server to the target subscription, you need to set a restore point for that database on the migration server. Then you can restore that database to the target server. It is very important that you use the naming convention and performance levels that you need for this restore as it is the final step in the process. Once again the restore process has no Microsoft SLA and as a result may take longer than planned. You need to have contingencies in place if you are working in a deployment window or have time restrictions.

Finally, you need to clean up the migration server. I would recommend either scaling down or pausing the Synapse database to give you a backup for a while if needed. Once the database is validated on the target server, you can remove the Synapse database (removes storage costs). I would recommend keeping this server as your migration server to use in the future. You can use this process to create copies of databases for development and UAT or similar needs from production instances.

Other Thoughts and Considerations

Here are my final thoughts on this process. First, the fact that no SLA on the restore process is provided by Microsoft has created issues for us in some cases. We have had to extend deployment windows during production deployments on occasion. My recommendation is to plan for the worst case and finish early if all comes together on time.

This process works! You can use it with other SQL assets and you can use it in multiple directions. Keep the migration server around so you can support other processes. If you clean most of it out, the cost of maintaining it is the S0 SQL Database.

One final thought, this is Azure. Thus, this guidance could change tomorrow. We have been using this for about 12 months when this was written. I hope this helps some of you move these databases to support your business and development needs.

Azure SQL Database Elasticity – Presentation Notes

This blog covers the content and points to the code used to create the demos in my Azure SQL Database Elasticity presentations. As of today, I have presented this at the Minnesota SQL Server User Group (PASSMN) in September 2020 and as a webinar for 3Cloud in October 2020.

Elastic Queries

Elastic queries allow developers to interact with data from multiple databases supported on the Azure SQL database platform including Synapse. Elastic queries are often referred to as Polybase which is currently implemented in SQL Server 2019 and Azure Synapse. The key difference is that elastic queries only allow you to interact with other Azure SQL Databases but not Hadoop or other database implementations (e.g. Teradata or Oracle). Part of the confusion comes from the fact that the implementation looks very similar. Both toolsets use external tables in SQL Server to interact with the connected data sources. However, Polybase requires additional components to run whereas elastic queries are ready to go without additional setup.

Be aware elastic queries are still in preview. Also, elastic queries are included in the cost of Azure SQL Database in standard and premium tiers.

Elastic Query Strategies

Elastic queries support three key concepts and will influence how you implement the feature.

  1. Vertical partitioning. This concept uses complete tables in separate databases. It could be a shared date table or dimensions in a data warehouse solution. Vertical partitioning is a method to scale out data solutions. This is one method to use Azure SQL database for larger data solutions.
  2. Horizontal partitioning or sharding. Whereas vertical partitioning keeps tables together, horizontal partitioning shards or spreads the data from a single table across multiple Azure SQL Databases. This is the most complex type of partitioning as it requires a shard map. This is typically implemented with .NET or Java applications.
  3. Data virtualization. This concept is a mix of the partitioning solutions to achieve the goal of virtualizing the data. The idea with data virtualization is that we can use a single Azure SQL Database to interact with data from multiple databases. While this concept is limited due to the limit to use Azure SQL Databases, it is a concept to look for more improvements as the product matures even more.

Elastic Query Demo

The demo used in the presentations is configured as shown here:

Three S1 Azure SQL Databases on the same Azure SQL Server. I used ADF (Azure Data Factory) to move Fact.Purchase to WideWorldDW_2 and the three related dimensions (dimDate, dimStockItem, dimSupplier) to WideWorldDW_3. I then used WideWorldDW_3 to implement the external tables to work with the data. The WideWorldImportersDW-Standard was used as the original restore of the sample database. It is the source of the data but is not used in the demos.

One note on the demo. I did not include the ADF jobs. Use the Copy activity to move the tables to the target databases. You can find more information here.

The demo code to set up the environment can be found here.

Elastic Jobs

Elastic jobs is the alternative to SQL Server Agent Jobs in Azure SQL Database. While Agent is included in Azure SQL Managed Instance, the rest of the platform needed an option to create jobs. Elastic jobs solves that issue. Currently this is also in preview and is also included with Azure SQL Database. The only additional cost is that a dedicated job database is required to support elastic jobs.

The best comparison is still with SQL Server Agent. Elastic jobs are structured with jobs which have job steps. The only limitation at the moment is that job steps must be T-SQL. Jobs can be created in the Azure portal, with PowerShell, with REST, or with T-SQL.

Elastic Transactions

One of the key pieces that was originally missing from the Azure SQL Database rollout was cross database transactions that were supported in SQL Server with MSDTC. Elastic transactions add this functionality to Azure SQL Database and is built into the platform. This functionality is application driven and currently supported in the latest .NET libraries. Overall, this will allow you to support transactions across 100 databases or fewer. While there is no limit, Microsoft currently recommends only using this to support distributed transactions over 100 or less databases due to potential performance issues.

There are a few limitations to be aware of:

  • Only supports Azure SQL Databases
  • Only supports .NET transactions
  • Does not support T-SQL Distributed transactions
  • Does not support WCF transactions

Wrap Up

Microsoft continues to improve the functionality in Azure SQL Database. These elastic features are part of that process. While I typically do not have many uses for distributed transactions, we have actively implemented elastic queries and elastic jobs for customers and look to use them more in the future.

Azure SQL Elasticity References

Hopefully you too will be able to use the elastic functionality as you continue to embrace the Azure data platform.

Your First Databricks Notebook

On August 4, 2020, I presented this on the weekly Pragmatic Works webinar series. You can view that presentation here.

As part of that presentation, I committed to give you access to the databricks notebooks so you can run through this as well. You can find the notebook on my Github. It is stored as a dbc (Databricks notebook) file. You will need Databricks to open the file.

Two questions were asked during the session that I wanted to handle here. The first was related to connecting to relational databases. The short answer is yes. You can use the JDBC driver to work with SQL Server or Snowflake for instance. Details can be found in the data sources article on the Databricks site.

The next question was related to Databricks ability to work with SFTP. While I cannot speak to the specifics, I was able to find the following Spark library that may be able to provide the support you need. To be clear, I have not implemented this myself but wanted to provide a potential resource to help with this implementation. I found this in a Databricks forum and it may work for you: https://github.com/springml/spark-sftp. If one of you finds this useful, feel free to post a comment here for others to refer to.

Thanks again for everyone who was able to attend. We look forward to continuing to work with Databricks more.

PASSMN June 2020 – Data Classification with SQL Server and Azure

I presented at the virtual Minnesota SQL Server User Group meeting on June 16, 2020. The topic was data classification with SQL Server 2019 and Azure SQL Database.

Data Classification Basics

Data classification in both SQL Server and Azure allow you to discover and label data based on information type and sensitivity. Information type is a way to describe the content of the data at high level. This includes types such as Address, Name, Networking, and Credit Card. By tagging your columns with types you will be able to easily see the types of data stored in your tables. You can also label the sensitivity. This includes labels such as Confidential and Confidential-GPDR.

Using SQL Server 2019 and SSMS 18.4+

For on premises implementations, you can use SQL Server Management Studio. I would recommend that you use SSMS 18.4 or greater. This has the most capability. SQL Server 2019 includes the sys.sensitivity_classifications system catalog view so you can query to see what field have been labeled.

To get started, open up SSMS. Right click the database and choose Tasks > Data Discovery and Classification > Classify Data. This will allow you to

Finding the Data Discovery and Classification Options in SSMS

view the Data Classification window in SQL Server. You will get a list of recommendations and the ability to add custom classifications in your SQL Server database.

The Data Classification view in SSMS

Once you have classified some of your data, you are able to view a report that shows the coverage of the classification work you have done.

Data Classification Report in SSMS

Adding Data Classification in Azure SQL Database

Azure SQL Database supports similar functionality for discovering and classifying data. The primary differences are (1) it requires Advanced Data Security which costs $15/month per server and (2) audit logging support is built in.

You can find this in the Azure portal with your SQL Database.

Advanced Data Security in Azure SQL Database

As you can see above, you get a visual here initially. Click the Data Discovery & Classification panel to open a similar classification window that we see in SSMS. This will allow you to discover and classify your data.

The key difference is turning on auditing and logging information about people querying the classified data. In the Security section in your SQL Database view in the Azure portal, choose Auditing. You can now add auditing to your server or database. (Click here for information about setting up Auditing.) I chose to use Log Analytics which is in preview. Log Analytics has a dashboard which shows activity in your database with this data.

Log Analytics Dashboard which Shows Access to Sensitive Data

You can click into the dashboard to dig into details. You can also use the Log Analytics query features to build your own queries to further analyze the data. The details contain who accessed the information, their IP address, and what was accessed. You can build more reports from that information to support more sophisticated auditing.

Final Thoughts

I think that there is still work to be done on SQL Server to better support auditing. Azure is ahead of the game in this area. More importantly, Azure logging is a platform level solution. You should be able to integrate your logging from the applications to the database in Azure.

You do have the ability to update the policy in SQL Server with a JSON file. I recommend you export the file and modify it. In Azure, you can update the information policy in the Security Center. Updating this policy allows you to discover data or information that you want to classify based on rules you set up. This should be part of your data governance plan.

One other follow up from the meeting. The question was raised about Visual Studio support in database projects. The answer is “sort of”. First, you need to make sure your project is targeting SQL Server 2019 or Azure SQL Database. Once that is set, you can use the following code to add the classification manually or you can apply it to your database and do a scheme compare to bring it in.

ADD SENSITIVITY CLASSIFICATION TO
    [SalesLT].[Customer].[FirstName]
    WITH (LABEL = 'Confidential - GDPR', LABEL_ID = 'fe62dcde-72c0-475c-b1af-fb8de4c8fc7e', INFORMATION_TYPE = 'Name', INFORMATION_TYPE_ID = '57845286-7598-22f5-9659-15b24aeb125e', RANK = MEDIUM);

You will need to know the GUIDs for the labels and types in your solution to do this manually. However, once this is done, you can see the information in the Properties window for the field as well.

Data Classification Properties in Visual Studio

The key thing to be aware of is that the properties are read only. You have to use the code to change them or do the changes in the database and use Schema Compare to bring them in.

Thanks again to those of you who joined us at the meeting. Here is the slide deck from that meeting. I look forward to sharing more with all of you later.

Azure Every Day, Azure Data Week, and More Azure

As you likely know, I am a Principal Consultant at Pragmatic Works. This year we have been doing some great things with Azure for our customers. Beyond that we have produced a lot of content and have an event coming up that I want to talk about. So, one step at a time.

Azure Every Day

PRAG_Banner_AzureEveryday_600x250-1.png

We are producing daily videos covering a variety of Azure topics. They are typically 3-5 minutes long and you can read the content in the Pragmatic Works blog as well.

Check out the YouTube channel here if you want to see all the videos we have published so far. I am going to republish my Azure Every Day blogs and videos here as a lead up to the next exciting event.

Azure Data Week

Get ready for the only 100% virtual Azure Conference – October 8 – 12. Five days, 25 sessions, all on Azure. Join Pragmatic Works  as we launch this new conference. The cost is only $29 and you will have access to the sessions for year. Microsoft and Pragmatic Works will be speaking on topics such as Power BI, Azure Data Factory, Security in Azure, and Azure roadmaps.

Post Linkden.jpg

More Azure

So if you want to check out what we are doing in Azure, have a look at Pragmatic Works and our team. We are doing more events with Microsoft over the next few months including regional training sessions on SQL Managed Instances, Azure Data Bricks, and Azure migration strategy. Ping me directly or reach out to Pragmatic Works if you are interested in our events or joining our team.